Trouble Brewing is a minigame on the island of Mos Le'Harmless.
Trouble Brewing is an Activity that takes place on the east side of the pirate island of Mos Le'Harmless. It is a non-combat activity. The main goal of the game is to make as much 'rum' as you can as fast as possible. To do this, there are a number of tasks that must be done, from gathering ingredients to taking care of the boilers. A special interface helps determine what needs to be done, but to function effectively, it's helpful to discuss with team members what tasks each will do beforehand.
To play the game, you must have completed the Cabin Fever quest and have at least 40 Cooking. It is also recommended to bring Boots of lightness, Monkeyspeak amulet, and a good Hatchet (though a Bronze hatchet will be supplied). World 104 is the official world for Trouble Brewing.
You can choose a team by joining up with San Fan (blue) or Fancy Dan (red), or you can use join team on Honest Jimmy, and you'll be put on a team. You are given a hat when you join the blue or red team. You must deposit any hat you were wearing first, in chest with Honest Jimmy. You must also deposit everything from your inventory, but not your worn items, in the chest.
When you join a team you are immediately put in a waiting room. There are copies of the Brewin' guide on the floor. You can read them to learn the rules of the game.
There needs to be at least 3 people on each team for the game to start.
The interface[]
Trouble Brewing interface.
The interface has several different icons on it. Along the top is amounts of ingredients. The number will be green if there is enough for another batch of 'rum'. The icons are as follow, from left to right:
The first three icons are the three boilers. They must each have at least 3 logs in them and must be lit to keep 'rum' production going, and can fit 10 maximum.
Bitternuts - Each bottle of 'rum' requires 1 bitternut.
Sweetgrubs - Each bottle of 'rum' requires 1 sweetgrubs.
Buckets of water - Each bottle of 'rum' requires 5 buckets of normal water.
Coloured water - Each bottle of 'rum' requires 3 bowls of coloured water.
Scrapey bark - Each bottle of 'rum' requires 1 scrapey bark.
Production status - When this is flashing green, there is a finished bottle of 'rum' that must be placed in the crate before the arrival of the next bottle pushes it off and breaks it.
The left side has the repair status of your team's equipment. If this shows a number, it means that something has been sabotaged by the other team. From top to bottom, these show the status of the hoppers, the pipes between boilers, and the bridges between islands.
In the lower right of the screen is the scoreboard and time left in a match. Each bottle of 'rum' is worth one point.
The base[]
The supply table.
The hoppers where ingredients are placed.
The base may seem complicated at first glance, but if you know where you're going, it's not so bad. The ground floor has the three boilers (where you put logs) and the pipes that can be sabotaged. A table nearby supplies you with any tools you might need to play the game. There is also the log store which starts off with a number of logs in it and can be added to, and next to it is a kettle that coloured flowers are put in to make bowls of coloured water. Just outside is a pump for water and a patch of coloured flowers of the other team.
On the top floor are the hoppers. This is where all the ingredients are placed. In the image below, they are, from left to right, normal water, coloured water, scrapeytree bark, sweetgrubs, and bitternuts.
Tasks[]
Coloured flowers/water[]
Perhaps the most important task, as coloured water is necessary for both 'rum' production and gathering Bitternuts. To gather these, you must run all the way to the other team's base. A patch of the flowers grows just outside it. There is no wait time to pick them, but you can only pick 5 at a time; however, a team-mate can keep picking flowers and trading them to you until your inventory is full. Once you've gathered the flowers, run them back and place them in the kettle in your base.
After there are flowers in the kettle, you can use a bowl to get the coloured water back out. Put it in the hopper upstairs or use it for gathering bitternuts (see below).
Tending the boilers[]
The boilers.
There are three boilers on the ground floor of your base. To light them, you must place one log in it, then use a tinderbox to light it. Once started, more wood can be added. There must be three logs in it to make 'rum', with a maximum of ten. Unlike the ingredients, the supply of wood in the boilers will continue to decline even when 'rum' isn't being produced. Signs in front of the boilers identify what number it is.
Gathering water[]
The simplest job. To get water, simply go to the pump outside your base and fill your buckets, then take it upstairs and place it in the corresponding hopper. If the pump has been destroyed, you must either fix it or go to the pond on the middle island, but this one won't automatically fill all your buckets.
For those who just want Pieces of Eight, this is a fast and effective way of getting a lot of them, but it's also a very common task, so it will often have been done already and won't do much good for the team.
Cutting wood[]
The log store.
A less needed task since the supply of logs in the store is pretty good to begin with, but should the supply dwindle, you can cut many of the jungle trees down and resupply the wood store. Scrapey tree logs can be placed in the log store and drawn out as ordinary logs.
Sweetgrubs[]
Around the area are mounds of dirt that sweetgrubs live in. To lure them out, you have to use raw meat on the mound. You can get an unlimited supply from the table in your base. If you succeed, you'll get some sweetgrubs. There are always two Sweetgrub mounds on the same side of the base as the coloured flowers.
There is a random chance that when you use the meat on the mound, it will draw out instead a swarm of Sweetflies. This is very much like the swarm random event, causing you to have to run. No one can gather more sweetgrubs from the mound while there are still sweetflies present.
The mound has a limited number of grubs, and when it's empty it will collapse. You'll have to find another mound or wait for it to fill again.
Scrapey Bark[]
There are a number of Scrapey Trees around the area that can be cut down. They usually yield several logs before being felled. There are always two Scrapey Trees on the same side of the base as the coloured flowers. Once the logs are in your inventory, you must use a knife to cut the bark off, at which point you can put it in the corresponding hopper.
If you are looking to collect Pieces of eight then with a rune axe, collecting 100 scrapey bark can be a good alternative to collecting 100 water. While it usually can take twice as long as collecting water, each log cut is worth 25 woodcutting exp, and you are rewarded 40 cooking exp for each bark added to the hopper.
There is a random chance while cutting the Scrapey tree or removing the bark from the logs that you may be diseased.
Bitternuts[]
The most complicated task. In order to gather Bitternuts, you must first get a few bowls of coloured water. Then, go to one of the islands and catch a monkey (which looks nothing like the Mos'le Harmless monkeys, and more like a Karamjan monkey). Dye the monkey with the water to mark it as being on your team, then use it on the Bitternut tree. The monkey will skitter up the tree and, after a little while, will toss you a nut. If another monkey is in the tree already, they will first fight and the winning monkey will get the nut.
If you have a Monkeyspeak amulet, you can alter the strategy used. You can choose to either make the monkey angry by taunting it, or caution him. By making him angry, he'll be more inclined to get up the tree as fast as possible and start pelting you with bitternuts, speeding up the time before you get a nut. If you tell him to be careful, he'll take a little bit longer, but will be more aware of other monkeys and will be more likely to win in a confrontation.
Sabotage[]
Sabotage is frowned upon by most players as detrimental to both teams, especially when playing with a small amount of players. To the sabotaged team because it slows down 'rum' production (no benefit is given to the team that makes the most 'rum'). To the sabotaging team because it is time wasted that could be used to collect ingredients.
With a lit torch, you can go to the other team's base and set things on fire. To do so, use the torch on what you want to sabotage. You'll either succeed or fail, and after a random number of attempts your torch will go out. Some things you can burn are:
Hoppers - Prevents the other team from adding ingredients or the ingredients to be added to the 'rum', though it won't damage anything already inside.
Pipes - Halts 'rum' production.
Pump - Forces water gatherers to go to the middle island for water.
Trees - Prevents the tree from being cut down and makes players go further for resources.
Bridges - Makes players go around or use the much slower jumping stones to get around. This is a double-edged sword, though, since it also makes it much harder for flower-gatherers on your team to get to the other team's base. You can only burn bridges on the opposing team's side. If your team is being swamped with sabotagers that just burn something then run back to get another torch, burning your opponents' bridge may help slow down their sabotagers.
Defence[]
Boiler pump.
Defence is truly important as, if your equipment is burnt, you can't get anything done. If something is set on fire, the first thing you need to do is put it out using a bucket of water. If not, it will eventually burn itself out, but you'll need more supplies to fix it afterwards. Once the fire is out, you can use the appropriate repair item to fix it. Pipes and pumps need bamboo pipes. Hoppers take lumber patches. Bridges take bridge sections. Depending on how long they were allowed to burn, it takes anywhere from 1 to 3 items to fix the problem.
You can also use the pump near the boilers on the first floor to gather pressure in the boilers. To do this, you must have over 50% run energy, and takes 10% each pump. It can hold up to 10 pumps worth of pressure. The reason to do this is defensive. When someone is trying to sabotage your boilers, you can right click the pump and select the vent option. By doing this, a burst of steam will run through the pipes. This will put out any fires currently burning and cause damage to opposing team members standing near a damaged section of pipe. You can continue to vent the pressure even if no fires are lite, and continue to damage any enemy team member standing near the pipe. If they die, they will return to their base with no loss of items. There's a negative side effect to this method, though. While it does put the fires out, it will damage the broken pipes further, taking as many bamboo pipes as if you'd let the fire run its course. Because of this, it is almost always more effective to use buckets of water to save bamboo pipes.
Another defensive course is to resupply the repair items. You can do this by taking logs and using them on the workbench in your base. You can either use them yourself or use them on the table to resupply it.
Bottle packing[]
A finished bottle of 'rum'.
When everything has been completed, a bottle of 'rum' will roll out the end of the line. This must be collected and placed in the crate, or it will be broken when the next bottle arrives. The bottle indicator in will blink green when a bottle of rum is ready to be packed. If the indicator turns red and stays red, the current bottle of rum will be destroyed by the next bottle of rum should it not be packaged quickly. The next bottle will come shortly if a bottle of rum is in production. Players who haven't contributed enough won't be able to see or collect it. Once the bottle has been placed in the crate, your team will get 1 point.
Pirate implings[]
There are about four pirate implings in a game, they can be caught using a butterfly net and an impling jar, which are provided in the supply area. A magic butterfly net can also be used. A pirate impling give 30 experience in hunter each when caught and give some items that can be handy during the game, such as bitternuts or coloured water. They cannot be taken out of the game.
Rewards[]
After each game, you will get an amount of experience from the tasks you performed and some Pieces of Eight based on ingredients contributed and how many bottles of 'rum' were successfully made.
Each bottle equals 2 Pieces of Eight, 100 Crafting experience, 250 Cooking experience, and 150 Firemaking experience. In addition, you gain 1 Piece of Eight and some experience for every ingredient contributed for up to 100 additional Pieces of Eight.
In order to gain rewards from 'rum' production, for each bottle of 'rum' you must have supplied at least:
1 bitternut,
1 sweetgrubs,
1 scrapeytree bark, or
3 bowls of coloured water.
If you are to come into a game of Trouble Brewing at the midpoint, you will receive less Pieces of Eight. Each bottle equals one Piece of Eight. In addition, you gain 1 Piece of Eight and some experience for every task you complete up to 50 additional Pieces of Eight. However if you come into a game of Trouble Brewing after the midpoint, the rewards will be the same as if you started from the beginning of the game.
Action
Experience rewarded
Buckets of water added
None
Coloured water added
40 Cooking
Sweetgrub added
40 Cooking
Scrapeytree bark added
40 Cooking
Bitternut added
80 Cooking
Log added to boiler
40 Firemaking
Equipment sabotaged
50 Firemaking
Repair item created
12.5 Crafting
Item repaired
12.5 Crafting
Burning object doused
50 Firemaking
Monkey captured
15 Agility
Boiler pressure increased
10 Strength
Honest Jimmy[]
You can also talk to Honest Jimmy to use your Pieces of Eight and get some unique items such as naval clothing, special Pirate banners, The stuff (which increases the chance of getting a mature ale from personal brewing), 'rum' (which acts as a teleport to the Trouble Brewing area).
You may also buy a treasure map from Honest Jimmy for 5,000 Pieces of Eight. It is a medium level clue scroll scroll map.
Honest Jimmy's House of Stuff[]
Item
Price (in PoE)
Naval shirt
1,000
Tricorn hat
500
Navy slacks
1,000
Cutthroat flag
2,000
Guilded smile flag
2,000
Bronze fist flag
3,000
Lucky shot flag
4,000
Treasure flag
5,000
Phasmatys flag
6,000
The stuff
50
Mos Le Harmless 'rum'
20
Notes[]
The Trouble Brewing uniforms (Tricorn hat, Naval shirt, and Navy slacks) are available in 7 different colours: blue, green, red, brown, black, purple and grey. These 7 sets of uniforms can be stored in the Armour case of a Player-owned house.
The Mos Le Harmless 'rum' is available in 2 colours: red and blue. Both are untradeable and have the same effect- teleporting the player to near Honest Jimmy.
Personalities[]
Honest Jimmy
San Fan - leader of the Cutthroat team
Fancy Dan - leader of the Gilded Smile team
Blue and red parrots - They tell you what to do in the game
Music[]
Music tracks unlocked:
Distillery Hilarity
Trouble Brewing
Trivia[]
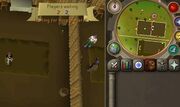
There is a glitch if someone dies in the waiting room (possibly of poison). The player count will stay the same as if the
Trouble Brewing Waiting room gitch (only one person present on Fancy Dan's team but the player counter says otherwise)


